Bathroom Remodel: Part 1
- Jul 26, 2024
- 2 min read
Demolition and patching
Remodeling usually means things look worse before they get better. The first stages of this project involved tearing up layers of previous flooring, tearing wainscoting off the walls, and taking out the vanity and toilet. Things got messy.
First, here are four pictures of how the bathroom started out.


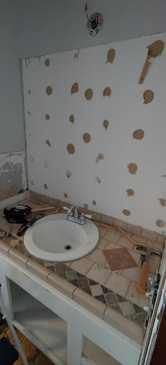
The wainscoting was glued on, so it tore the drywall in some areas and left glue in other areas. After hours of peeling, cutting, and scraping, this is what I ended up with. It looks bad, but it was ready for a coat of primer at this point, which it needed before applying drywall compound.

But I couldn't move ahead with primer and compound yet, because the toilet and vanity were still blocking some of the walls. I was trying to keep our toilet and sink operational as long as possible, so I didn't tear those out yet. Taking up the floor was the next step.
I smashed up the tile bit by bit with a hammer and scooped it into buckets. Underneath the tile was a 1/4" subfloor (plywood) which I had to peel up, and then hundreds of nails had to be removed. Underneath the subfloor was some lovely brown vinyl roll flooring, which was also on a 1/4" subfloor. I peeled that up inch by inch and removed the hundreds of staples holding that down. Of course, I still couldn't remove the layers of flooring under the toilet and vanity.


It was finally time for the vanity to come out. I didn't expect the trim pieces to be glued to the mirror with construction adhesive, and I didn't expect the mirror to be glued to the wall with some kind of indestructible black adhesive of death.
I incrementally tapped wooden wedges between the mirror and the wall to slowly pry it off while hoping it didn't blow up in my face. It ended up working quite well, but I was still left with a ton of hard scraping to get the mirror edges cleaned up. Taking out the rest of the vanity and the toilet were the easy parts!


After tearing up the rest of the flooring and prepping the remaining walls, I primed the walls and floor (as an extra vapor barrier). My dad helped put drywall compound on the walls, and I did some sanding and more priming. It was a huge relief to have finally arrived at the point where things start looking better instead of worse!

Next week will be much more aesthetically pleasing since it'll be full of new stuff, including installing the new vanity.

Comments